Image Occlusion Done Right: Anatomy and Diagram Mastery
Learn when to use image occlusion, how to group and sequence cards, and avoid clutter—plus deck hygiene and AI-powered helpers.
TL;DR
Learn when to use image occlusion, how to group and sequence cards, and avoid clutter—plus deck hygiene and AI-powered helpers.
Table of Contents
Need help turning messy notes into clean flashcards?
MemoForge pulls highlights, structures prompts, and exports straight to Anki so your study time stays focused on recall.
Image Occlusion Done Right: Anatomy and Diagram Mastery
There’s a moment that trips up a lot of learners: you open a crisp anatomy diagram and feel a rush to cover every single label with boxes. Thirty-seven boxes later, you’ve made a Christmas tree. And it looks impressive—until review time. Then you dread it.
You know what? Image occlusion is fantastic when it supports how the brain learns space. It’s rough when it turns into a guessing game. The goal is simple: build a clean mental map, then add precision. Like zooming a map—country, state, city—without blurring the edges.
When to Use Image Occlusion (And When to Skip It)
Use image occlusion when you’re learning locations, spatial relationships, or patterns:
- Labeling structures (heart chambers, cranial nerves, kidney regions)
- Finding features on maps or engineering schematics
- Recognizing patterns (radiology, histology, ECGs)
Don’t force occlusion where a plain question works better:
- “What does the left ventricle do?” → basic card, not image occlusion
- “What comes next in the conduction pathway?” → cloze card, not image occlusion
Quick test: if the thing you’re learning needs space to make sense, occlude. If the meaning lives in words or steps, keep it basic or cloze.
Group First, Then Zoom
The biggest problem with image occlusion is trying to learn all details upfront. Group structures in layers so your brain forms a sturdy scaffold.
Three levels that work:
- Level 1: major regions (brainstem vs cerebellum vs cerebrum)
- Level 2: functional systems (heart chambers, valves, major vessels)
- Level 3: details (specific nuclei, tiny branches, named grooves)
Practical tip: make short sets that match each level. You’ll build confidence without burning energy on details you can’t place yet.
Progressive Disclosure (So Your Map Sticks)
Move from big picture to detail. Then connect the layers.
Example flow for respiratory anatomy:
- Week 1: major regions—upper vs lower tract, left vs right lung
- Week 2: functional paths—bronchi → bronchioles → alveoli
- Week 3: details—segments, cell types, clinical landmarks
That pace might feel slow, but recall speeds up because context is baked in. You’re not grabbing facts in the dark; you’re placing them on a map you already know.
Sequencing and Hinting
A few small adjustments make occlusion cards smoother:
- Fewer boxes per card: 4–6 early; later, 8–10 max
- Clear hints: directional arrows or tiny labels off‑frame
- Consistent orientation: don’t flip between views without warning (anterior vs posterior)
Deck and Media Hygiene (The Quiet Work That Pays Off)
Image‑heavy decks build clutter fast. Keep it tidy.
- File names that make sense:
anatomy_heart_overview.jpg
anatomy_heart_valves.jpg - Right format:
PNG for line diagrams, JPEG for photos - Reasonable sizes:
~800–1200px width—big enough to read, small enough to load fast - Nested decks:
Medical → Anatomy → Cardiovascular → Heart → Valves
Cleaning up once a week takes five minutes and saves your sanity later.
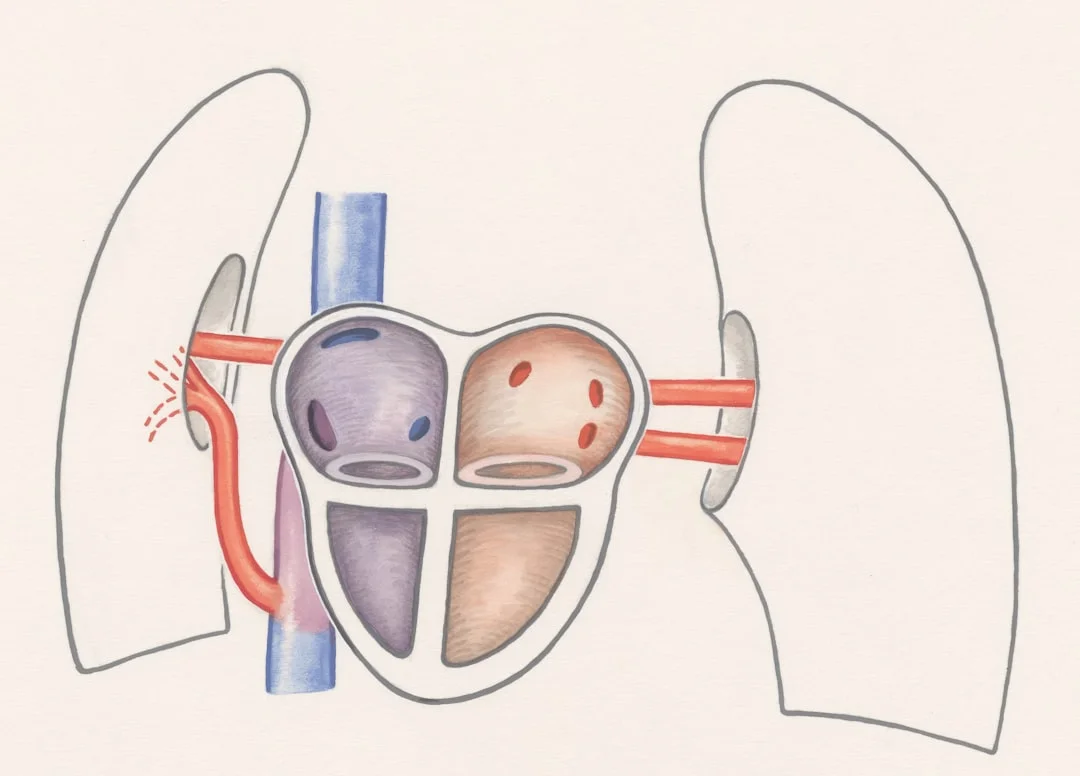
A Step‑by‑Step: Heart Anatomy Set
Let’s sketch an effective build using one base image.
Card Series 1: Chambers (four occlusions)
- Goal: place RA, RV, LA, LV without confusion
- Hint: small arrows showing inflow/outflow
Card Series 2: Valves (four occlusions)
- Goal: connect each valve to the right chambers
- Hint: flow arrows help a lot here
Card Series 3: Major Vessels (six occlusions)
- Goal: remember how blood enters/exits the heart
- Optional: color code arterial vs venous paths
Card Series 4: Integrated Review (8–10 occlusions)
- Goal: test multiple labels once the base is solid
- Keep it under ten; more is a chore, not a test
Common Pitfalls (And How to Fix Them)
The Christmas Tree
- Problem: too many occlusions at once
- Fix: cap at 8–10; split into a few focused cards
Microscopic Text
- Problem: labels are tiny and unreadable on a phone
- Fix: higher‑resolution image or simplified diagram
Context Loss
- Problem: occluding so much that you can’t tell where you are
- Fix: leave landmarks visible—edges, landmarks, directional cues
Wrong Card Type
- Problem: using image occlusion to test a function
- Fix: switch to a basic or cloze with a crisp prompt
Where AI Helps (And Where It Doesn’t)
AI can help:
- Suggest smart box placements for labels
- Group structures into logical sets
- Flag clutter (too many boxes, overlapping cues)
- Generate variations (structure location vs function recall links)
AI can hurt when:
- It produces too many cards from one diagram
- It hides half the image and leaves you guessing
- It mixes unrelated structures in one card
Simple rule: use AI to draft, then you approve. If a card feels confusing to future‑you, it’s not ready.
Quick‑Start Plan (15 Minutes)
- Pick one diagram you care about this week
- Make one overview card with 4–6 occlusions
- Make one functional set (e.g., valves only)
- Review both today; anything sticky gets a hint or a split
- Add one integrated card later in the week
FAQ (Short and Practical)
How many occlusions per card?
Start with 4–6. Once you’re confident, you can push to 8–10. Past that, split. Always split.
Should I create separate cards for different views?
Yes. Anterior, posterior, sagittal—each view builds a different spatial memory.
What about diagrams with 20+ labels?
Group them by function and learn in sets. Your brain likes order.
Do I need separate cards for function and location?
Usually yes. “Where is it?” and “What does it do?” are different skills.
Map It, Then Master It
Image occlusion shines when it respects how we learn space. Group first. Keep cards lean. Use hints generously. Then review without fear. The feeling you want is clarity—like recognizing a neighborhood from a few familiar streets. And once that clicks, details stop feeling like noise and start feeling obvious.
If you want help setting up clean, progressive occlusion cards from lecture diagrams, let a tool suggest sets and placements. Keep your hand on the wheel, though—your map, your pace, your confidence.
Related Articles

PowerPoint and Image Flashcards: Turn Slides and Photos into Study Decks
Convert PowerPoint presentations, lecture slides, and images with text into structured flashcards. Perfect for visual learners, students with slide-heavy courses, and anatomy study.
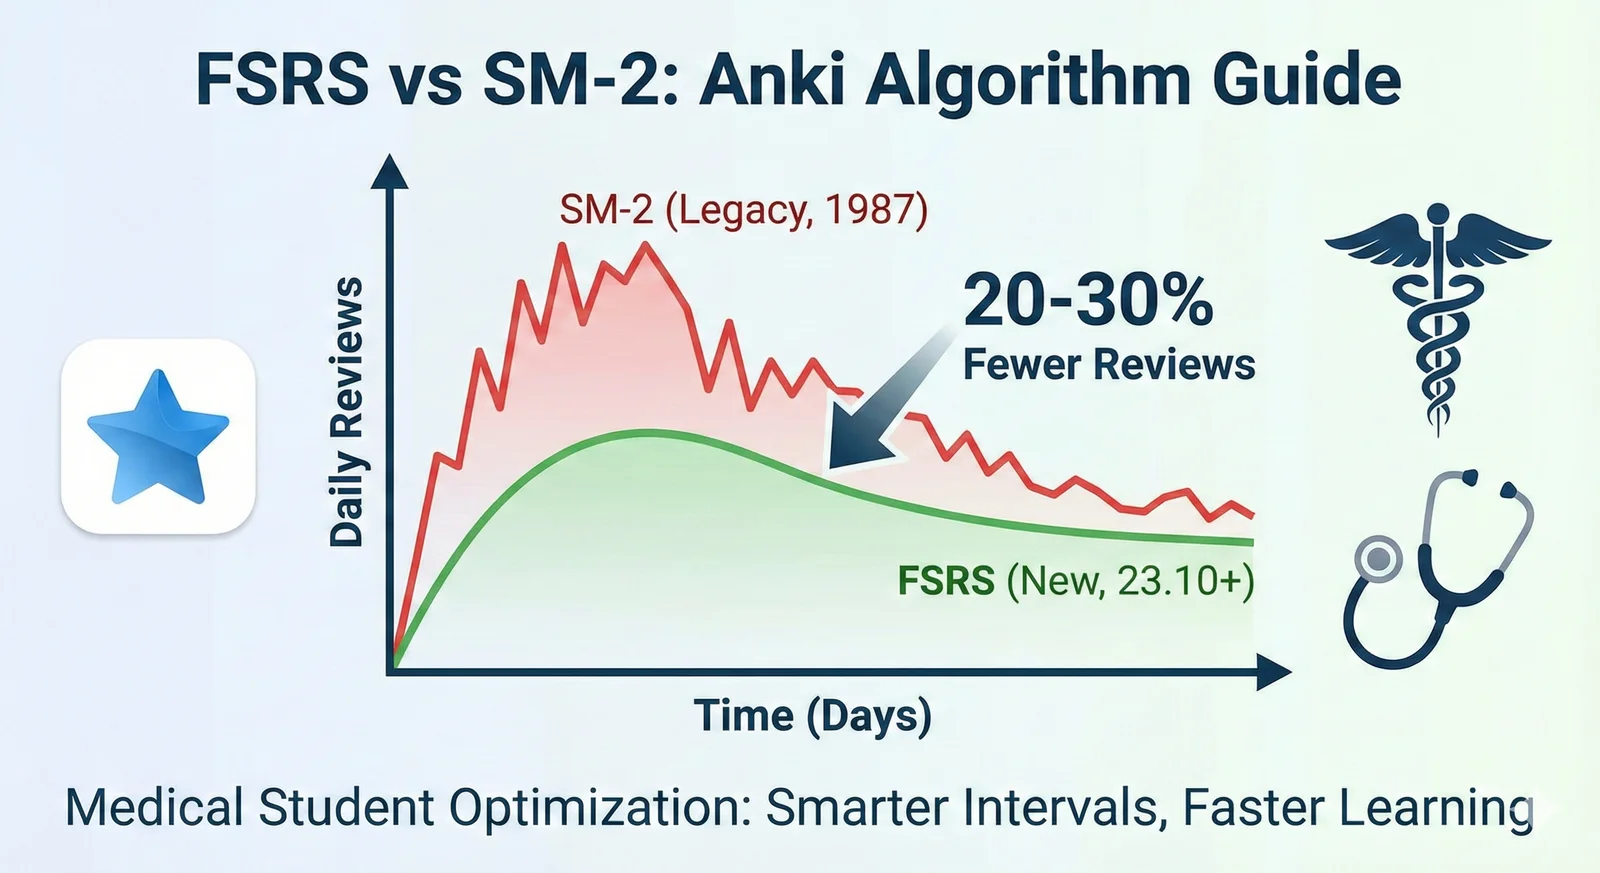
FSRS vs SM-2: The Complete Guide to Anki's New Algorithm for Medical Students
Everything you need to know about switching from SM-2 to FSRS. Step-by-step migration guide, optimal settings for medical school, and why we made FSRS the default engine for MemoForge.
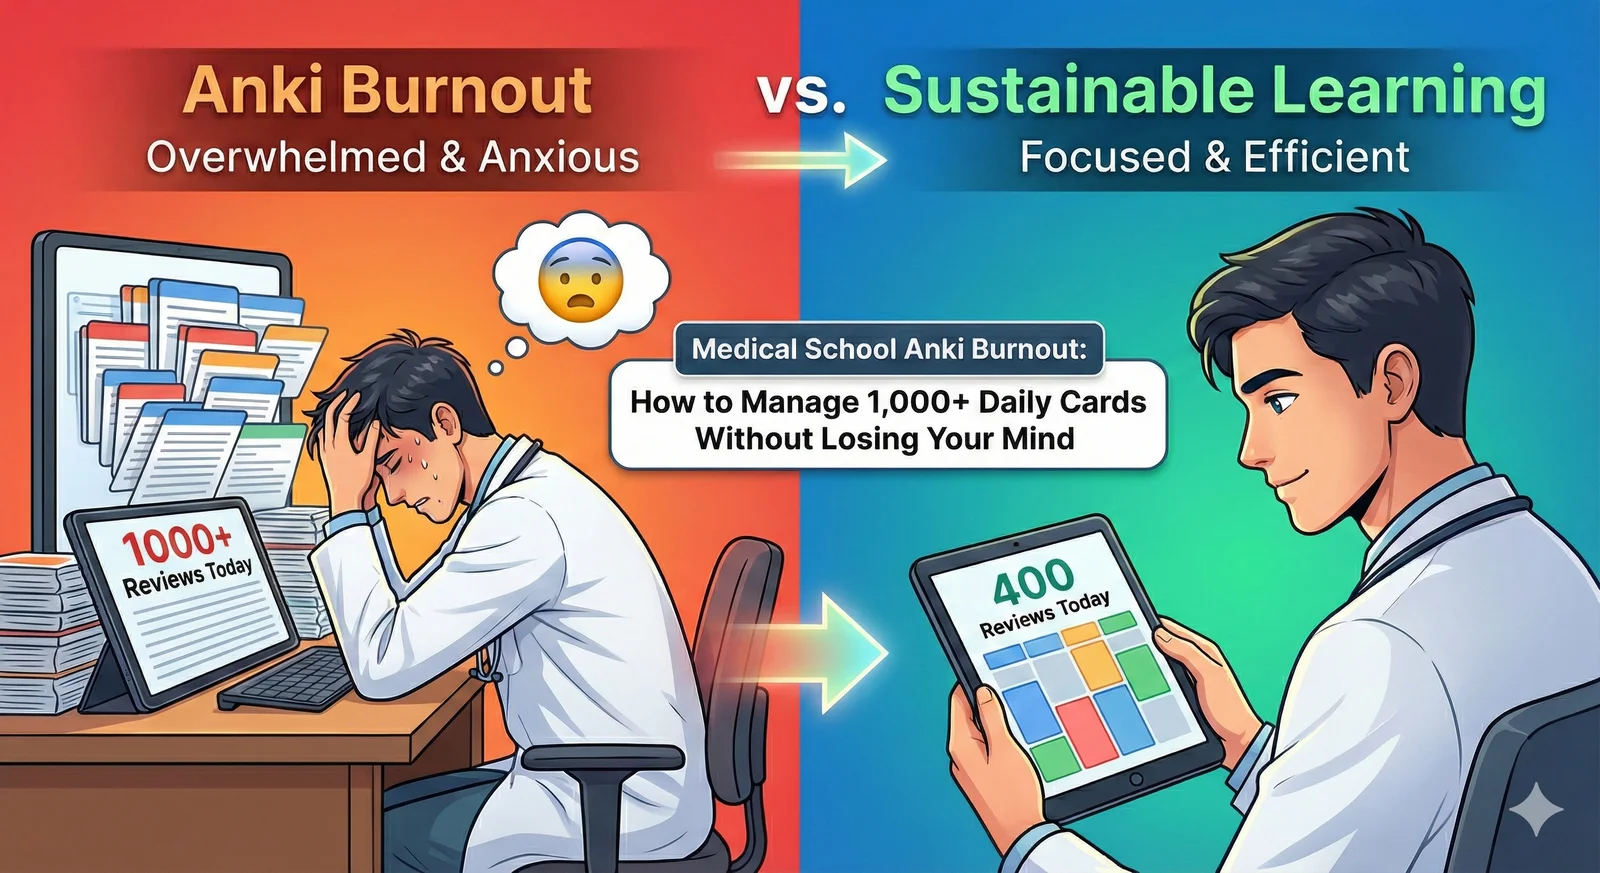
Medical School Anki Burnout: How to Manage 1,000+ Daily Cards Without Losing Your Mind
Practical strategies for medical students drowning in Anki reviews. Emergency triage for backlogs, sustainable daily limits, and how to eliminate the card creation bottleneck.